
How to manage documents
The Documents area holds all of a patient's letters, scanned files, imported PDFs, incoming correspondence and reports. This article covers the two places you manage them:
- The Documents tab on the patient record, where you browse, view, edit, reclassify and move a patient's documents.
- The Document Workflow System, which moves letters, reports and clinical documents through drafting, approval and distribution. Each step is usually performed by a different user (typist, doctor, distributor), and each user only sees the documents that need their attention.
The patient Documents tab
Open the patient's record and select the Documents tab. Documents are shown in a tree, and can be grouped either by folder or by date depending on your choice.
Folders
The folder list (for example Referrals, Correspondence, Results) is configured for your practice. Adding, renaming or reordering folders is not something you can do from within HealthTrack.
Contact HealthTrack support if your practice needs its folder structure changed.
View a document
Select a document in the tree to preview it. From the viewer you can:
- Page through multipage documents.
- Rotate a scanned document that came in sideways or upside down. The rotation is saved, so the document stays the right way up for everyone.
- Print the document.

Individual documents can be restricted to a security group. If a document is restricted and you are not in the right group, it is hidden or shows an access denied message.
Edit a document, and how locks work
Opening a document for editing checks it out to you. This stops two people editing the same document at once:
- While you have it open, anyone else who tries to edit it is offered a read-only copy instead.
- When you close it, your changes are checked back in as a new version. The tab always shows the current version.
- If HealthTrack closed unexpectedly while you had a document open, the document can be left locked. When you (or another user) next open it, HealthTrack explains who holds the lock and offers to clear it.
Other actions on a document
Right-click a document in the tree for the full list of actions.

| Option | What it does |
|---|---|
| Save version history | Saves the document's version history. HealthTrack creates a new version each time an edited document is checked back in. |
| Share Record | Sends a secure link to the document by email or SMS. Recipients open it in a web browser and need no additional software. |
| Open | Opens the document. |
| Generate Outbound Results | Generates an outbound result message for the document, so it can be sent to an external system or provider through your practice's integrations. |
| Attach Metadata | Attaches additional data to the document. |
| Prints the document. | |
| Send For Review | Sends the document to one or more users for internal review. |
| Create New Task | Creates a task linked to the document and sends it to a staff member's task list. |
| Move to Patient | Re-files the document under a different patient. Use this when a document has been imported or classified against the wrong patient. See Move a document filed to the wrong patient below. |
Move a document filed to the wrong patient
If a document has been imported or classified against the wrong patient, you can move it rather than re-importing it:
- Open the Documents tab on the patient the document is currently filed under.
- Right-click the document and select Move to Patient.
- Use the Find Target Patient button to select the correct patient.
- Select MOVE.
- The document now appears in the correct patient's Documents tab.

Moving a document to another patient is controlled by the DocMoveToPatient permission. If the option is missing or unavailable, ask your practice administrator.
Delete a document
There is no permanent delete in the Documents tab. Deleting a document moves it to the Deleted folder, where it no longer appears among the patient's active documents but is retained.
If a document was deleted by mistake, it can be restored by moving it back out of the Deleted folder.
The Document Workflow system
- Every document in the workflow has an Owner / Approver and an Assignee:
- The Owner / Approver is the user whose name appears on the finished document (for example, the doctor on a referral letter).
- The Assignee is the user currently working on the document (for example, the typist preparing it).
- A document only enters the workflow when Use Workflow is selected on the Classify screen (letters and documents) or the Info screen (clinical reports).
- Clerical items such as appointment reminders or consent forms are usually left out of the workflow, with the assignee and approver set to the same user.
What each user sees in the Document Management window depends on two settings: their Document Group and their Document Management Role. For more detail around this, review our article: Document Groups and Management Roles.
Open Document Management
You can open Document Management in four ways:
- Select Workflow > Document Management from the menu bar.
- Select the Documents widget or Clinical Records widget on My Dashboard.
- Select the Document Workflow button in the Clinical Summary tab.
- Select the Workflow button in the Clinical Records tab.

Choose your view
The window has two tabs. Select the tab that suits your workflow:
- Document Management Tab - list view with sortable columns for patient, status, assignee, priority, and duration.
- Previewer Tab - shows a preview of the selected document alongside the list. Useful when reviewing content before actioning.
Filter your view
Use the filters at the top of the window to control which documents are displayed.

Work filters
- My Work - documents where you are the creator, assignee, or owner/approver.
- My Workgroup - documents assigned to your Document Group (e.g. DM-Doctor, DM-Typist).
- Delegated Work - documents from users who have delegated their work to you.
- Assigned Work - documents where your work has been assigned to another user.
- All Work - all documents regardless of assignment.
Date filters
- Select the Include Records Created During checkbox to restrict results created in a specific date range.
- Select a date range using the calendar button, or click Default to restore the default view (today plus the prior 18 months).
Document type filters
- Use the Clinical, Letters, or Clinical & Letters buttons to narrow results by document type.
Document statuses
Each document moves through a series of statuses. What you see in Document Management depends on your Document Management Role.
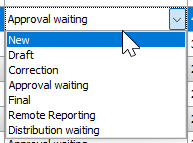
| Status | Meaning |
|---|---|
| New | Document has been created and is ready to be worked on. |
| Draft | Document is currently being prepared or typed. |
| Correction | Changes are required. Document has been returned to the assignee. |
| Approval Waiting | Document is awaiting review and sign-off from the owner/approver. |
| Final | Document has been approved and is ready for distribution. |
| Distribution Waiting | Document is queued for distribution. |
Approving a document (moving it to Final)
Moving a document to Final is the approval step. HealthTrack records who approved the document, and the document becomes ready for distribution.
Some rules apply around who can finalise and when:
- The user who created or typed a document usually cannot finalise it themselves. Approval is expected from the owner/approver (for example, the doctor). The exceptions are users who have been given the ChangeStateToFinal permission by their practice administrator, and documents where Creator or Assignee to Approve has been selected in the Notes panel (see below).
- Finalising can be blocked if the document is flagged Attention Required, or if the document has no distribution set up. A missing distribution either shows a warning or prevents finalising entirely.
- After a document reaches Final, it can only be moved back to an earlier status for a limited time. After that window, only a workflow administrator can revert it or a user with the ChangeStateFromFinal permission.
- Finalised documents also lock for editing, so the approved content cannot be changed without reverting the status first.
Document notes and specifications
Each document in the workflow has a Notes panel. Use it to record instructions for the next user in the chain or to flag specific handling. Notes can be added or edited from the Note column in the Document Management tab, the right-hand panel of the Previewer tab, or the Note button at the top of Clinical Records.
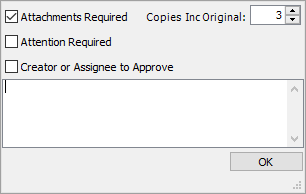
The Notes panel includes the following options:
- Attachments Required - flags that attachments need to be added or reviewed before the document is finalised.
- Attention Required - holds the document back from distribution until the flag is cleared.
- Creator or Assignee to Approve - allows the assignee to finalise the document instead of the Owner / Approver. Use this when the assignee does not have permission to finalise on their own (for example, a secretary tidying formatting on a doctor's behalf).
-
Copies Inc Original - sets how many copies should print when the document is distributed.
Action a document
To move a document forward or backward in the workflow:
- Click the document in the list to select it.
-
Select the Next State icon to advance to the next status (e.g. final), or Previous State to return it (e.g. back to Correction).

-
Alternatively, click directly in the State column for the document to select a status from the drop-down.
To change who a document is assigned to, click the Assignee field directly in the list. To change priority, click the Priority field.
Moving a document to a new status reassigns it to you unless you have manually set a different assignee. This keeps the document with the person actively working on it.