Create & Manage Letter Templates
Letter templates are reusable documents such as letters, certificates, referral responses, and information sheets that use tags to automatically populate patient, booking, and referring doctor details. Each template has two components: a base file (a .docx or PDF created outside HealthTrack) and a template configuration set up in the Letter Template Manager.
Step 1 - Create the base template file
Before configuring a template in HealthTrack, create the base file externally. Tags in the format <HMS-FieldName> will be replaced with live data when a letter is created from the template.
For a full list of available tags, see the Letter Template Tags article.
Word document template
Create the file in Microsoft Word. Add a header, footer, and body content, and place letter tags wherever data should populate. Save the file as a .docx file.

PDF form template
To use a PDF as the base template, add form fields - not plain text - using a PDF editor. Tags use the format <<FieldName>>.
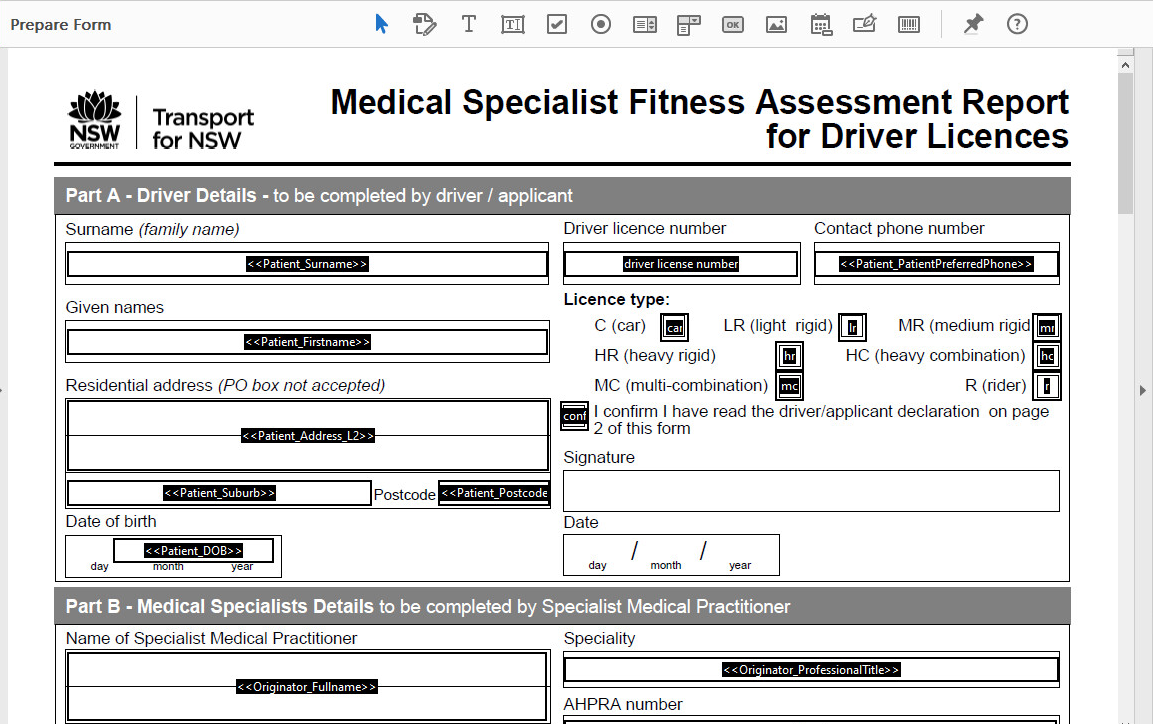
PDF forms often include fields that do not correspond to a HealthTrack tag. Those fields can be completed manually when the letter is created.
Step 2 - Import the base template to HealthTrack
Once the base file is ready, import it into HealthTrack so it can be used when configuring a template.
- Navigate to Admin > Letter Template Manager.
- Click File Manager.
- Click Import.
- Browse to the file and click Open.
- If prompted to rename the file (file name too long or already in use), enter a new name and click Done.
- Click OK on the success confirmation.
- Repeat steps 3–6 to import additional files, then click Done to close the File Manager.
Step 3 - Configure the letter template
With the base file imported, create the template configuration that controls how the letter behaves in HealthTrack.
- Navigate to Admin > Letter Template Manager.
- Under the Templates section, click New.
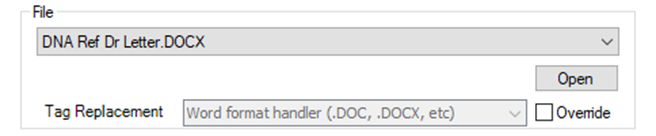
- In the Letter Template Settings screen, select the File from the drop-down. This is the file imported in Step 2.
- Enter the Description - this is the name users will see when selecting a template. Enter the Position folder if applicable.

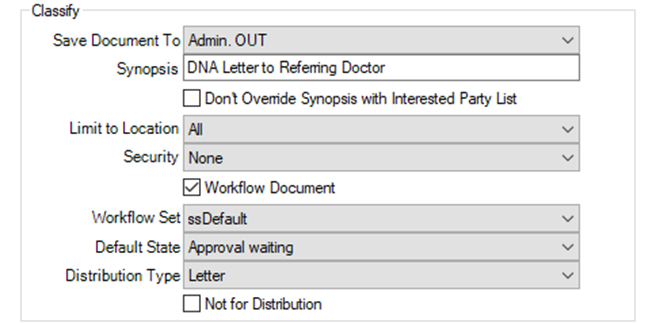
- In the Classify section, set Save Document To (the default Documents folder), enter the Synopsis, and configure Limit to Location and Security if this template should only be available at specific locations or to certain user groups.
- If a specific doctor or user should always be set as the Owner/Approver, tick Preset Originator and select the individual.

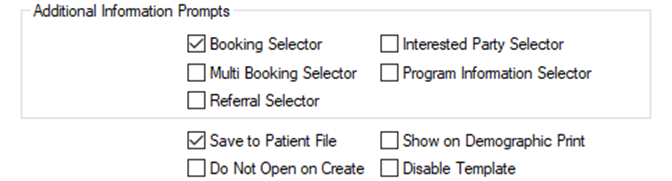
- Under Additional Information Prompts, tick any selectors the user should be prompted for when creating a letter (e.g. Booking Selector, Referral Selector, Interested Party Selector).
- Click Save.
Letter Template Settings reference
| Setting | Description |
| File | The base template file, previously imported via File Manager. |
| Tag Replacement | The file type used for tag replacement (e.g. .doc, .docx). Tick Override to change the Word format handler. |
| Description | The name shown to users in the Letter Template Selector when creating a letter. |
| Position | The folder the template sits in within the Letter Template Manager. |
| Patient Connect Enabled | Allows this template to be used for Patient Connect recalls. |
| Save Document To | Default folder in the Documents tab where letters created from this template are saved. Users can change this per letter. |
| Synopsis | The default letter title shown in the patient's Documents tab. Users can override this per letter. |
| Don't Override Synopsis with Interested Party List | By default, the synopsis lists the letter's recipients. Tick this to show the Synopsis field value instead. |
| Limit to Location | Restricts the template to users logged in at a specific location. Useful for location-specific letterheads. |
| Security | Restricts the template to a nominated user group. |
| Workflow Document | Tick for templates that go through a review and approval process before distribution. |
| Workflow Set | The approval workflow used when Workflow Document is ticked. |
| Default State | The status assigned to the letter when it is created (e.g. Approval Waiting, Final). |
| Distribution Type | Controls how the letter is received by third-party secure messaging systems. |
| Not for Distribution | Prevents the letter from being automatically distributed once finalised. |
| Preset Originator | Locks the Owner/Approver to a specific doctor or user on all letters created from this template. |
| Booking Selector | Prompts the user to select a booking when creating a letter. Required to populate booking-related tags. |
| Multi Booking Selector | Prompts the user to select two or more bookings. Requires custom multi-booking tags in the template. |
| Referral Selector | Prompts the user to select a referral when creating a letter. Required to populate referral and referring doctor tags. |
| Interested Party Selector | Prompts the user to select recipients. Required to populate Interested Parties tags. |
| Save to Patient File | Tick to save a copy of the letter to the patient record. |
| Do Not Open on Create | Prevents the letter from automatically opening in the editor after creation. |
| Disable Template | Hides the template from the Letter Template Selector without deleting it. |
Managing letter templates
The Letter Template Manager toolbar provides controls for organising and maintaining your templates.

Template controls
| Button | Action |
| New | Creates a new letter template configuration. |
| Edit | Opens the settings for the highlighted template for editing. Also provides access to the base file. |
| Copy | Duplicates the highlighted template under a new name. |
| Delete | Removes the template configuration. The base file remains available in the File Manager. |
| Preview | Opens a split-screen preview showing the template with tags un-populated and populated. A plain-text preview is also available. |
| IDs | Shows a numeric ID next to each template name when ticked. |
Folder controls
Use folders to group related templates. Click New to create a folder, Rename to rename it, or Delete to remove it along with all templates inside it.
Place frequently used templates in the base directory (not in a folder) so they appear at the top of the Letter Template Selector.
Reordering templates
Use the arrow buttons to change the order templates appear in the Letter Template Selector:
- ↑ moves the highlighted template up.
- ↓ moves the highlighted template down.
- → moves the highlighted template into the folder directly above it.
- ← moves the highlighted template out of its current folder.
Edit an existing template
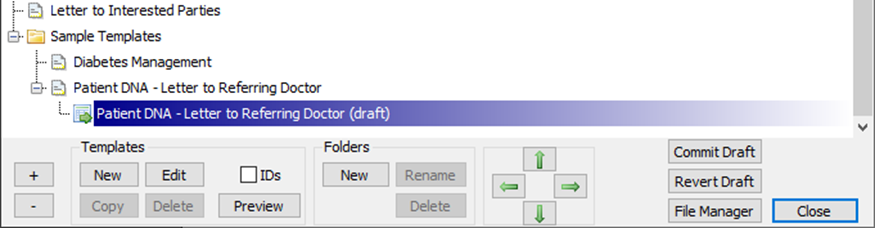
HealthTrack uses a draft system when editing templates. Changes are held in a draft until you are ready to make them active, so the existing template continues to work during editing.
- Navigate to Admin > Letter Template Manager.
- Highlight the template and click Edit.
- In the upper right, click Open. This opens the base file in your preferred Word editor.
- Make the required changes to the template, then save and close the file.
- In the Editing Draft Template screen, click Save Draft.
- A draft version appears below the active template in the list (labelled with "(draft)"). You can continue refining it without affecting the active version.
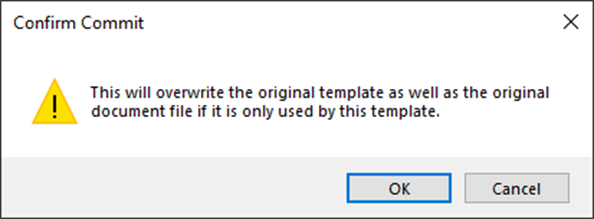
- When all changes are complete, click Commit Draft to make the updated template active.
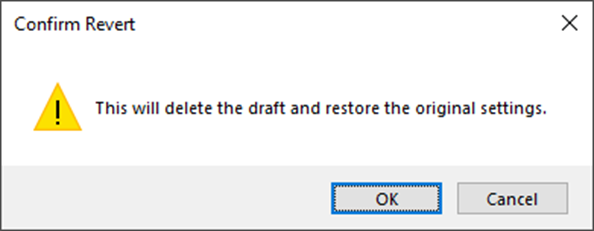
To discard changes, click Revert Draft. You will be prompted to confirm that the draft will be deleted.
If you duplicated a template using Copy and need to edit the new copy, ensure the Tag Replacement Override checkbox is ticked in the settings screen. This allows the Word format handler to be selected from the drop-down.