How to Batch Bill
Batch billing allows you to combine multiple invoices for the same provider at the same location into a single claim submitted to Medicare, a health fund, DVA, or a third-party organisation. To access this feature in HealthTrack, navigate to Accounts > Batch Billing to open the Batch Billing module.
The Batch Billing History screen
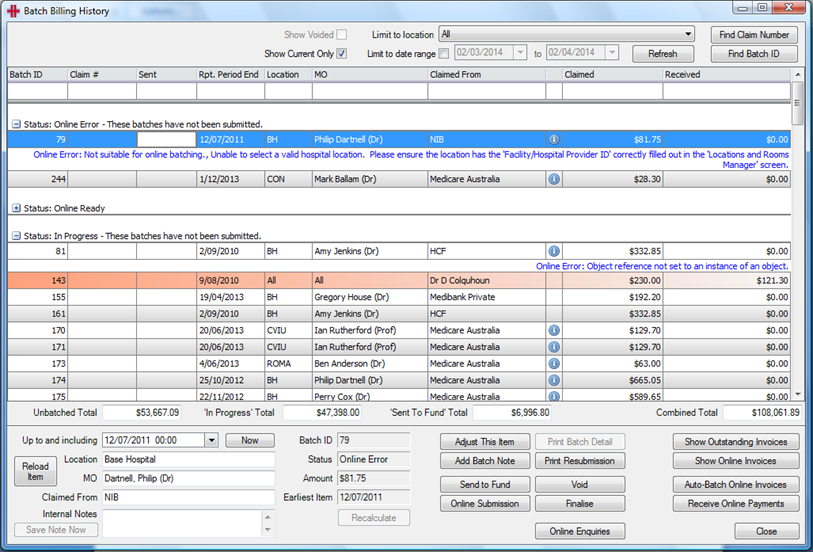
- The Batch Billing History screen lists all batches for the selected location.
- The filters at the top: Location, Date Range, Show Current Only, and Show Voided can be used to narrow the list.
- The Find Claim Number or Find Batch ID buttons can be used to identify a specific batch.
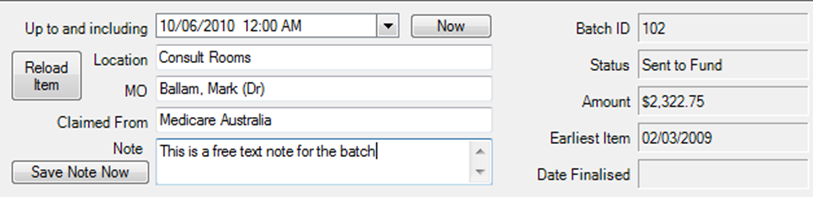
- Selecting a batch displays its details in the lower section of the screen, including date, location, provider, company, batch note, status, and total amount.
The totals at the bottom of the screen show outstanding amounts grouped by status: Unbatched, In Progress, Sent to Fund, and Combined.
Batch statuses
Each batch moves through the following statuses:
| Status | Meaning |
| In Progress | The batch has been created but not yet submitted. |
| Sent to Fund | Submitted manually by post or email. No electronic response will be received in HealthTrack. |
| Online Ready | Waiting for HealthTrack to send the batch electronically. Allow approximately 30 minutes. |
| Online Error | An error occurred during submission. Review the error text and correct the batch before resubmitting. |
| Online Sent | HealthTrack has submitted the claim. Waiting for Medicare or the health fund to process it. |
| Online Received | Payment processing advice has been received. You can now view it in Receive Online Payments. |
| Finalised | All items in the batch have been paid or accounted for. |
| Void | The batch has been cancelled, or all items have been removed from the batch. |
Submit claims online
Online submission is used for Medicare, DVA, and eligible health fund claims. There are three ways of submitting claims online:
Auto-Batch Online Invoices (recommended)
This method automatically splits available invoices into valid batches and submits them.
- Navigate to Accounts > Batch Billing.
- Set the 'Location' filter using the drop-down at the top of the screen.
- Select Auto-Batch Online Invoices in the bottom right-hand side of the screen.
A progress window appears while batches are created. Created batches move directly to Online Ready status.
Auto-Batch is the recommended method - it ensures invoices are grouped correctly and validates them before submission.
Show Online Invoices
Use this method if you prefer to review and create batches manually before submitting.
- Navigate to Accounts > Batch Billing.
- Select Show Online Invoices.
- HealthTrack verifies each invoice. The Online Capable Batches window opens, listing each organisation and provider/location combination.
- Select Create Batch for each combination you want to batch.
- Select Close when done.
- In the Batch Billing History screen, highlight each new batch and select Online Submission. The batch moves to Online Ready status.
Create New Batch (This Invoice Only)
Use this method to batch a single invoice from the patient's record.
- Open the patient's record and navigate to Accounts > Transaction Listing.
- Right-click the invoice and select Create New Batch (This Invoice Only).
- The Batch Billing History screen opens. The new batch is in In Progress status. Highlight the batch and select Online Submission.
- The batch moves to Online Ready status.
Resolve online errors
If HealthTrack detects missing or invalid data during submission, the batch moves to Online Error status. Error details will appear in blue text below the batch for reference.
Common error causes include:
- No referral included for the services, or the referral dates do not cover the date of service.
- The servicing provider is the same person as the referring doctor (mark the items as Self-Deemed and remove the referral to rectify this).
- The patient's Medicare, health fund, or DVA details have not been verified recently.
- Health Fund Relationships have not been configured for the provider number.
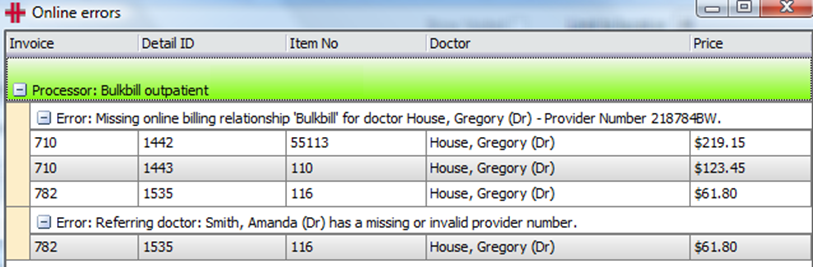
- To view more detail around the error, select Online Submission again to display the Online Errors window with a full error description.
- To create a Worklist of affected patients, select To Worklist at the bottom of the window.
- After correcting the issue, select Online Submission again to resubmit the batch.
HealthTrack automatically retries all Online Ready batches every 30 minutes. If a retry fails, the batch returns to Online Error status with the reason shown in blue.
Submit claims manually
Use manual submission for organisations that do not accept electronic claims (e.g. worker's compensation, some insurers etc.). The batch follows this path: In Progress > Sent to Fund > Finalised.
Manual submission records that invoices have been sent. Please note that no electronic reports are received in HealthTrack for these batches.
- Navigate to Accounts > Batch Billing.
- Select Show Outstanding Invoices.
- The Unbatched Invoices Summary window opens. Select Create Batch for each provider/location/organisation combination.
- Select Close when done.
- Highlight each new batch in the Batch Billing History screen and select Send to Fund. The batch moves to Sent to Fund status.
Use Print Batch Detail to print a list of invoices in the batch before sending.
Finalise online batches
When a batch has been processed, HealthTrack receives two reports: a Processing Report (itemised claim and payment amounts) and a Remittance Advice Report (total payment summary). These are downloaded automatically and are available in Accounts > Batch Billing. When a Processing Report is received, the batch moves from Online Sent to Online Received status.
View reports and finalise a fully paid batch
- Navigate to Accounts > Batch Billing.
- Right-click the batch in Online Received status and select Goto Receive Online Payments. (Or select Receive Online Payments to view all unprocessed batches at once.)
- In the lower left of the Receive Online Payments window, tick Print Processing Report and/or Print Remittance Advice as needed.

- Select Print Selected Batch to view reports for the highlighted batch, or Print ALL Batches for all displayed batches.
- If the batch was paid in full (Claimed and Paid columns match), select Finalise.
- The Automatically Finalise Claim window opens. Review the totals. If correct, select Automatically Finalise Claim.
- Select OK on the confirmation prompt. The batch moves to Finalised status.
Finalise a partially paid batch
If a batch is highlighted in orange in the Receive Online Payments window, the amount paid differs from the amount claimed. Refer to the Processing Report for the reason.
To manually receipt the partial payment:
- In the Receive Online Payments window, select Finalise for the batch.
- In the Automatically Finalise Claim window, select Manually Finalise Claim.
- Verify the Health Fund, Location, and MO details are correct.
- Select Receive New Payment and enter the payment details.
- Select the payment method button (Cheque or EFTPOS) and enter the amount.
- Select Save.
- Tick the Allocation circle next to each batch to allocate the payment. Use Plus and Minus buttons to select the whole batch, or expand the batch to allocate to individual invoices.
- Select Save Allocations and Close when done.
When an invoice can't be fully paid, select the [...] button to choose how to handle the outstanding balance: adjust the balance, leave it outstanding, or move it to the patient's account.