
ePrescribing & Health Identifier Setup
Before setting up ePrescribing, each provider must be registered with eRx and your organisation must hold valid NASH certificates and health identifier numbers. This article covers the full setup process in HealthTrack.
Before you begin
Obtain the following before configuring ePrescribing in HealthTrack. Requirements 3–5 may require access to PRODA and HPOS (Services Australia portals).
- eRx Entity ID: One per provider. Register at eRx: Prescriber Registration. Allow 1–3 business days. Select HealthTrack as the Prescribing Software.
- Active MIMS Subscription: Contact HealthTrack Support to confirm.
- Request a NASH Certificate: One certificate per HPI-O. Obtain via HPOS.
Do not attempt to open or run the downloaded certificate file.
- HPI-I (Healthcare Provider Identifier – Individual): One per provider. Register via Services Australia.
- HPI-O (Healthcare Provider Identifier – Organisation): One per location, or a single HPI-O for all locations. Register via Services Australia and link each provider to the organisation.
Step 1 - Configure the location
Complete this step for each location that will use ePrescribing. You will need your NASH certificate file and its PIC (Personal Identification Code).
Steps 4–10 below are only required when importing a new certificate. If you have one certificate and are configuring multiple locations, complete steps 4–10 once, then skip to step 11 for each additional location.
- Navigate to Admin > Locations and Rooms > Locations and Rooms Manager.
- Select a location from the drop-down menu in the top left corner.
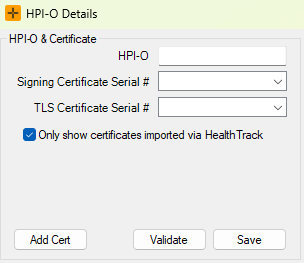
- Click Manage HPI-O in the bottom right corner.
-
Click Add Cert.
- Click Choose File, then locate your NASH certificate in the Windows Open dialog and click Open.
-
Enter the PIC in the Password field.
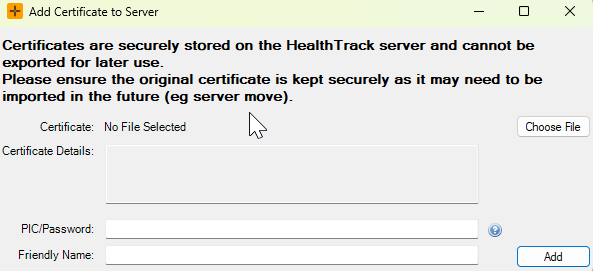
- When the correct PIC is entered, the Certificate Details section updates with a Serial # and dates. Note the Serial # - you will need it in step 12.
- Enter a Friendly Name to identify this certificate (e.g. the location name).
- Click Add.
A message about Medicare Root and/or Organisation certificates may appear. Click OK to continue - HealthTrack will automatically install the required Medicare certificate chain.
- When prompted that the certificate was added successfully, click OK.
- Enter the HPI-O for this location.
- Select the location's NASH certificate in both the Signing Certificate Serial # and TLS Certificate Serial # fields.
If the certificate is not listed, clear Only show certificates imported via HealthTrack. If it is still not visible, the certificate has not been installed on the server.
- Click Save.
- The Validate button will only work once the Certificate Serial # fields have been saved.
-
When the confirmation message appears, click OK.
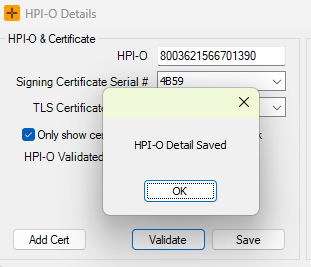
Close the HPI-O Details window. Repeat this step for any additional locations. Steps 4–10 are only required once if using a single certificate.
Step 2 - Configure each provider
Complete this step for each provider that will use ePrescribing. You will need their eRx Entity ID and HPI-I.
Step 1 (location configuration) must be completed before configuring providers.
- Navigate to Admin > Internal MO > Manage Internal MOs.
- Select a provider from the drop-down menu in the top left corner.
- Confirm the provider's Prescriber No is entered in the upper right corner.
- Confirm Work Ph and Work Fax are entered (if a contact number should appear on prescriptions).
-
Confirm the provider's Qualifications are entered.
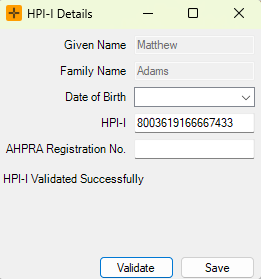
Click Edit HPI-I Details in the upper right corner.
Enter the provider's HPI-I.
-
If the HPI-I is unknown, enter the provider's Date of Birth and AHPRA Registration No., then click Validate to search. If validation fails, confirm the provider's given name and family name match their PRODA/AHPRA registration exactly.
-
- Click Save. Only the HPI-I is saved - Date of Birth and AHPRA Registration No. are used for lookup only.
If you later change a provider's name, HealthTrack revalidates their HPI-I against the HI Service. Allow for this when editing an existing provider, as the HPI-I may need to be confirmed again after a name change.
- Close the HPI-I screen.
- Click eRx in the upper right corner.
- Enter the provider's eRx Entity ID, select the appropriate Prescriber Type from the drop-down, then select Doctor can electronically prescribe.
- The Doctor can electronically prescribe checkbox cannot be saved until password requirements are met. See Step 3 below.

- Click Save.
In Western Australia, the current user must be designated an Electronic Prescribing Administrator before enabling or disabling ePrescribing for a provider. See the section below.
Step 3 - Set password requirements
All users with access to electronically prescribe must have a sufficiently strong password. This password is used to log in to HealthTrack and again when prescribing Schedule 8 medications. This requirement cannot be disabled.
To set or reset a password, navigate to File > Set Password.
Western Australia only - Electronic Prescribing Administrators
In Western Australia, a user must be designated as an Electronic Prescribing Administrator before they can enable or disable ePrescribing for a provider.
- Navigate to Admin > Security > Security and Permissions.
- Locate the user, right-click their User ID, and select Edit User.
- Select Electronic Prescribing Administrator.
- Click Save.
The user can now enable or disable ePrescribing for providers in Western Australia.
The patient's IHI (Individual Healthcare Identifier)
The steps above set up the identifiers your practice and providers need to prescribe: the HPI-O for each location and the HPI-I for each provider. The IHI is the third health identifier. It is a 16-digit national number that identifies the patient, not the practice or the provider.
Unlike the HPI-O and HPI-I, the IHI is not part of ePrescribing setup. It is recorded on each patient's record in the Additional Tab in the IHI section. It can be entered or verified by reception or clinical staff. The IHI section appears only when health identifiers are enabled for your organisation, and only for Australian practices. New Zealand practices use the NHI instead.
Entering and validating an IHI
- Open the patient's record and go to the health identifiers (IHI) section of their demographics.
- Enter the patient's IHI into the IHI field, or use Verify to look it up from the HI Service.
- When you enter an IHI, HealthTrack validates it against the HI Service straight away and will not keep it if it is invalid.
- A look-up fills in the number and its statuses for you.
- To remove an IHI, clear the field. Clearing the field does not require validation.
The IHI must be 16 digits and include a valid check digit. A number that is the wrong length, or that fails the check, is rejected before it is used.
The two IHI statuses
Each IHI carries two separate statuses, both shown as labels on the patient record:
- IHI Status (the identifier's lifecycle): Active, Deceased, Expired, Resolved or Retired.
- IHI Record Status (how well it has been verified): Provisional, Unverified or Verified. A blank record status means the verification level is unknown.
If the HI Service reports a duplicate or conflicting IHI for a patient's details, HealthTrack flags it and warns you.
The record also shows where the IHI came from and when it was last checked. The last-checked time matters for the 24-hour rule that applies before a My Health Record upload. That rule is covered in the My Health Record area.
On HealthTrack Web the IHI and its statuses are read-only. Entering or verifying an IHI is done in the desktop application.