
How to use the Triage screen
Patients can be queued and prioritised via the Triage screen. This screen lets you view, prioritise, and convert booking requests into diary bookings. Booking requests arrive here from online ASAP bookings, walk-ins added at the desk, and questionnaire responses.
Open the Triage and Waiting List Monitor
- Click Practice Wide in the top menu bar.
-
Select Triage from the menu.
The Sign In dialog opens. Configure your sign-in options:
- Providers - Select the I will be accepting patients checkbox if you plan to take patients directly. Optionally select Include Patients signed to 'Any' MO to see unassigned entries as well as those assigned to you.
-
Admin staff - Leave the first option clear.
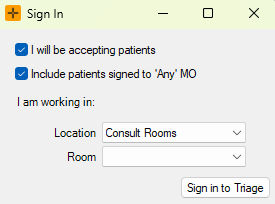
- Select your Location and Room.
- Click Sign in to Triage.

The Configuration drop-down at the top of the monitor controls which entries are displayed. Select All Booking Requests to view all ASAP and online booking requests, or choose a custom configuration to filter by location, booking type, or other criteria.
If you sign in without selecting I will be accepting patients, the Take Patient button shows as Close instead. Sign in again with the option selected if you need to take patients.
Viewing Triage entries
The Triage and Waiting List Monitor displays all current triage entries. Each row shows the patient name, booking type, location, room, requested time, wait time, triage time, status, triage score, and workflow.
Each configuration chooses which locations, booking types, doctors, statuses and workflow steps it shows, and how often the list refreshes.
If an entry you expect is missing, switch to the All Booking Requests configuration before assuming the request was lost - the most common cause is a configuration that filters it out.
Entries that have already been converted to bookings are kept at the Complete workflow step rather than deleted. If your configuration includes the Complete step, you will see already-processed entries in the list - check the workflow column before processing an entry a second time.
How entries are ordered
Triage entries can be ordered by triage score. A specific score can be assigned to each Triage Option and the greater the score, the higher up on the Triage screen it will display.
For example, an Urgent Review can be scored as 1000 while all other Triage Options can be scored as 0. This will result in Urgent Reviews consistently being placed at the top of the Triage list for reference.
Patients with higher triage scores can then appear higher in the list, and the longer a patient waits, the higher their effective priority becomes, based on the Score Per Minute Waiting value in the configuration you are viewing.
For assistance with setting this up and ordering your triage options by score, please contact support on support@healthtrack.com.au.
The score weightings (including the score per minute waiting) belong to each saved configuration and are set up with help from HealthTrack support. If the queue order looks wrong, the weighting configuration is the usual cause - contact support to review it.
To manually reorder entries:
- Right-click an entry and select Prioritise to the top.
- Drag and drop entries to move them higher or lower in the list.
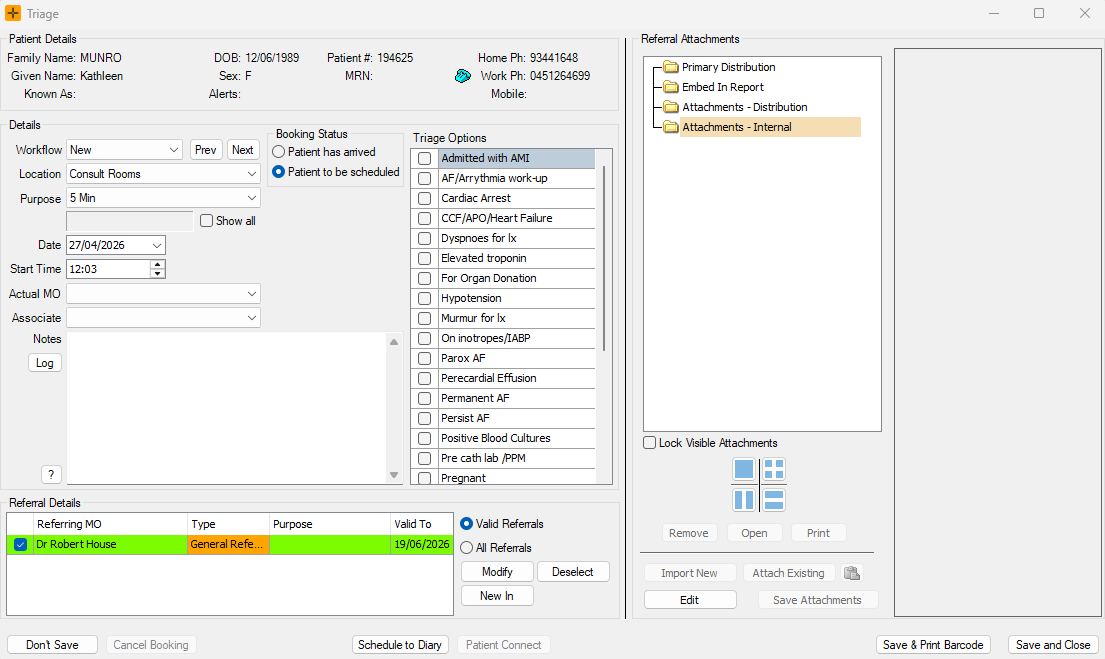
Add a Walk-in/Triage Entry to the Triage List
- In the Triage and Waiting List Monitor, click Walk In / Triage.
- The Find Patient window opens. Search for and select the patient.
- In the Triage window, enter the booking request details. The Purpose field is required.
- Select the relevant Triage Option/s.
-
Click Save and Close. The patient is added to the triage list.
Process a Triage Entry
There are two ways to convert a triage entry into a diary booking, and they suit different roles:
- Take Patient is for providers who want to see the patient now. It creates a booking starting immediately, at your signed-in location and room, and switches HealthTrack to that patient.
- Schedule to Diary is for admin staff booking the patient into a future diary slot.
In both cases the triage entry is not deleted - it moves to the Complete workflow step with the new booking linked to it.
A triage entry must have a Purpose (booking type) before it can be converted. If conversion is blocked with "A purpose must be selected", edit the entry and set the purpose first.
Take Patient (Providers)
Use this workflow if you are the provider and want to see the patient now. Take Patient is only available to users set up as a doctor (or an associate) at the working location.
- In the Triage and Waiting List Monitor, ensure I will be accepting patients is selected (set during sign-in).
- From the relevant configuration, highlight a triage entry.
- Click Take Patient in the bottom-right corner.
- In the Booking Form window, review and adjust details as needed. The Location, Purpose, Date, Time, and Actual MO are populated automatically:
- The Date and Start Time default to the current date and time.
- The Doctor is set to the provider who clicked Take Patient, which may differ from the provider originally selected.
- The Location and Room are based on the sign-in details, which may differ from what was originally selected.
- Click Save or Save and Close to create the booking. The booking is placed in the diary with an In Session status, HealthTrack switches to the patient, and the triage entry is removed from the active list.
Because the patient is taken straight into session, the booking skips the Arrived status. Patients taken this way will not appear in the waiting room list.
If two staff members try to take the same entry at once, the second person sees a message that the entry has been taken or modified by another user. No double booking is created - refresh the list and pick the next entry.
Schedule to Diary (Admin Staff)
Use this workflow to schedule the patient into a future diary slot.
- In the Triage and Waiting List Monitor, sign in as needed.
- From the relevant configuration, select a triage entry.
- Enter or adjust details for the Location, Purpose, Date, Time, and Actual MO.
- Click Schedule to Diary to open the Diary.
- In the Move List on the left-hand side, select the patient to be scheduled.
- Click an available booking slot in the diary.
- In the Move List, click the => button to create the booking in the selected slot.
- The booking is created and the triage entry is closed.
Automatic SMS messages
HealthTrack sends automatic SMS messages for triage entries that arrived as requests (online ASAP bookings and questionnaire-originated requests):
- When the request is scheduled to the diary, the patient is sent a confirmation SMS automatically.
- When the request is cancelled (rejected), the patient is sent a rejection SMS automatically. The default wording starts with "Your recent booking request has been rejected" and can be changed - contact HealthTrack support to adjust the message text.
These automatic messages apply only to requested entries. Walk-in entries added at the desk do not trigger a scheduled or rejected SMS.
Editing an Entry
- In the Triage and Waiting List Monitor, highlight the entry you want to edit.
- Click Edit Entry, or double-click the entry.
- In the triage entry screen, you can:
- Change the patient (click Change Patient)
- Cancel the booking request
- Schedule the request to the diary
- Modify the referral or booking details
Cancelling a booking request removes it from the triage list and, for online or questionnaire requests, sends the patient the automatic rejection SMS. Check you have the right entry before cancelling.
Online Booking Requests
When a patient submits an ASAP booking request through the online booking system, it appears in the All Booking Requests configuration in Triage. The Notes on the triage record include:
- A note that the request was created via the Online Booking system
- The date and time the request was created
- Any comments entered by the patient
Scheduled online bookings (where the patient selected a specific date and time) are created directly in the diary and do not appear in Triage. Only ASAP requests - where the patient has requested the next available time - are routed to Triage.
An optional site setting can route every online booking (scheduled as well as ASAP) through Triage. If scheduled online bookings are appearing in your triage list, this setting is turned on for your practice.
If a patient says they submitted an ASAP request but you cannot see it:
- Switch to the All Booking Requests configuration - a custom configuration may be filtering it out by location, booking type or workflow step.
- If it is not there either, the submission most likely failed before it was saved. The patient would have seen an error at the time and needs to submit the request again.