
How to Export Data From HealthTrack
The Export Data tool lets you pull lists of data out of HealthTrack. HealthTrack comes with a range of ready-made exports, organised by area, so you can run most reports yourself in a few clicks.
What Data You Can Export
Exports are grouped by the part of HealthTrack they relate to, including:
- Clinical Records: patient conditions, diagnoses, and other clinical data.
- Patients: patient contact and basic record details.
- Billing: invoice, billing, and item number information
- Doctors: referring & internal MO details
Each export opens your results directly in Excel, ready to sort, filter, or share.
The list only shows the exports your user account is allowed to run. Some exports need a specific permission before they appear, so if an export you expect to see is missing, your security group may not have access to it yet. A user who manages security and permissions can grant access.
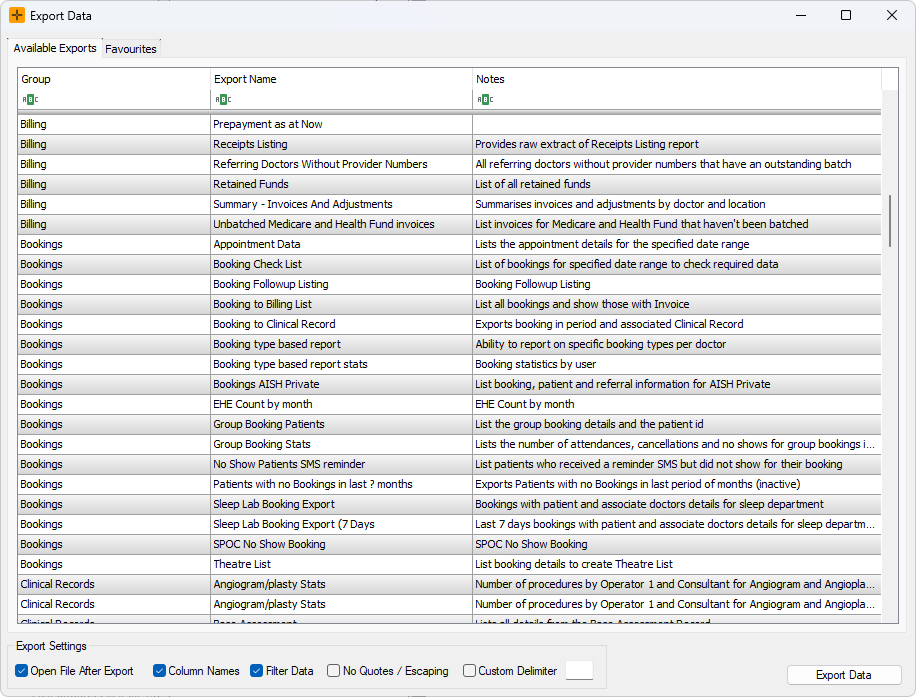
How to Export Data
You need the DataExports permission to open Export Data. If the menu item is greyed out or missing, ask a user who manages security and permissions to grant it.
- Go to Admin > Exports and Imports > Export Data.
- Browse the list and select the export you need - for example, Conditions in the Clinical Summary group.
- You can type the export name in the Export Name column header to filter the list out and search for a specific export.
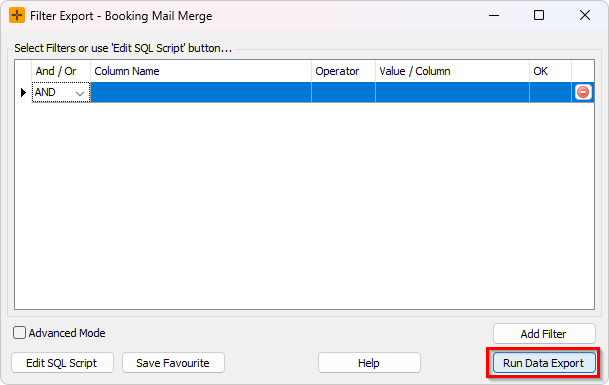
- Select Export Data to open the Filter Export screen.
- Once the required filters have been added, select Run Data Export.
-
You will be prompted to save the exported data as a .csv file. This can be directly opened in Excel for further filtering/processing.
For very large data sets, save as CSV. Excel has a limit on the number of rows it can open, so a very large export may not fit in an Excel file.
Filtering your results
Many exports let you narrow the results before you run them.
- Prompted values. Some exports ask you for values such as a date range or a location. HealthTrack prompts you for each value it needs before the export runs.
- Filter. For exports built on a data view, you can add filters to limit the results, for example to a date range or a single location. The advanced filter is where you enter the condition the export should apply.
When you build a filter, you can use wildcard characters to match part of a value rather than the whole thing. The table below shows the wildcard characters available and what each one matches.
| Wildcard character | Description | Example |
|
|---|---|---|---|
| % | Any string of zero or more characters. | LIKE %echo% finds all booking types with the word 'echo' anywhere in the name. |
|
| _ (underscore) | Any single character. | LIKE _mith finds five-letter surnames ending in 'mith', such as Smith. |
|
| [ ] | Any single character within the specified range ([a-f]) or set ([abcdef]). | LIKE Ols[eo]n finds the surname whether it is spelt Olsen or Olson, because the bracketed letter can be e or o. |
|
| [^] | Any single character not within the specified range ([^a-f]) or set ([^abcdef]). | LIKE Ols[^eo]nfinds surnames such as Olsan or Olsin, but not Olsen or Olson, because the bracketed letter is anything except e or o. |
|
Filtering by Date
Commonly, you would want to filter an export for a specific time range. This can be done for a wide variety of Date fields, depending on the export.
- From the Filter Export screen, select a Column Name value which is a date.
- To filter for all entries before a certain date, configure a filter with the < Operator (less than symbol).
- To filter for all entries after a certain date, configure a filter with the > Operator (greater than symbol).
- Once the Column Name and Operator have been specified, click into the Value / Column box, which will allow you to select a date.
To filter for a certain time period, you will need two filters: one for the start date, and one for the end date. The example screenshot below filter for all dates between the 1st of May, 2026 to the 31st of May, 2026. Make sure not to mix up your operators!

Export Data vs Patient Export
HealthTrack has more than one export tool, and they do different things:
- Export Data (this article) runs a ready-made export and saves the results as a single file. Use it for lists and reports, such as a list of patients or bookings.
- Patient Export is a separate tool that exports full patient records (demographics, clinical notes, records, medications, and documents) for one patient or many, into a folder of files. It is used for tasks like moving records between systems, not for everyday reporting.

These exports can contain patient information, so treat access to them as sensitive and keep the relevant permissions limited to the staff who need them.
Need a More Specific Export?
The built-in exports cover most everyday needs, but you can also tailor an export to your exact requirements - such as a particular condition, date range, or combination of fields.
If you need help setting up a specific export, or you regularly run the same report, email our team at support@healthtrack.com.au with:
- The kind of data you'd like to export (for example, patients with a particular diagnosis).
- The motivation behind your export.
- Any date range or other criteria.
- How often you expect to run it.
We can guide you through the right filters, to help build a custom export for your practice so it's ready to run whenever you need it.